Linux GRUB手动安装方法详解
需要手工安装 GRUB 主要有两种情况:
- Linux 系统原先不是使用 GRUB 作为引导程序而现在想要使用 GRUB 来作为引导程序;
- MBR 中的引导程序被覆盖,需要在 MBR 中重新安装 GRUB,如先安装了 Linux 系统,后安装了 Windows 系统。
下面,我们分别介绍这两种情况如何手工安装 GRUB 引导程序。
系统中没有GRUB,需要手工安装
我们先来讲第一种情况,就是 Linux 系统中没有安装 GRUB,我们需要重新安装 GRUB;或者打算把不是启动分区的某个分区变成启动分区。比如我的系统中新建了一个分区 /dev/sdb1,并挂载到了 /tdisk/ 目录上,我们查看一下新建立的分区,命令如下:
[root@localhost ~]# df
文件系统 1K-块 已用 可用 已用% 挂载点
/dev/sda3 19923216 1787736 17123412 10% /
tmpfs 312672 0 312672 0% /dev/shm
/dev/sda1 198337 26359 161738 15% /boot
/dev/sdb1 2071384 68632 1897528 4% /tdisk
这个分区是我手工建立的,当然不是系统的默认启动分区(系统默认启动分区是 /boot 分区)。我们用这个分区模拟一个不是采用 GRUB 作为默认引导程序的 Linux 硬盘,在这个分区中手工安装 GRUB 引导程序。也就是说,这个实验成功后,/boot 分区可以启动系统,/tdisk 分区也可以启动系统。
具体安装步骤如下:
1) 使用 grul-install 命令在要启动的分区中安装 GRUB 相关文件
在 /boot 分区中有一个 /boot/grub/ 目录,这个目录中保存的就是 GRUB 的相关文件(如文件系统的 Stage 1.5 文件)。我们查看一下 /boot 分区中的这个目录,如下:
[root@localhost ~]#ls /boot/grub/
device.map ffs_stage1_5 jfs_stage1_5 reiserfs_stage1_5 stage2
xfs_stage1_5 e2fs_stage1_5 grub.conf menu.lst splash.xpm.gz
ufs2_stage1_5 fat_stage1_5 iso9660_stage1_5 minix_stage1_5 stage1
vstafs_stage1_5
但是在 /tdisk 目录中并不存在这些文件,所以第一步就是要在 /tdisk 目录中安装这些 GRUB 相关文件,具体采用 grub-install 命令。这个命令的格式如下:
[root@localhost ~]# grub-install [选项] 设备文件名
选项:
- -root-directory=DIR:DIR 为实际目录,也就是手工指定 GRUB 相关文件的安装目录;
【例 1】命令标准格式。
[root@localhost ~]# gmb-install /dev/sda
#因为默认 GRUB 就是安装到 /dev/sda 中的,所以不需要指定 --root-directory 选项
我们需要把 GRUB 安装到 /tdisk 分区,所以需要执行以下命令:
[root@localhost ~]# grub-install --root-directory=/tdisk/dev/sdb1
#把GRUB安装至/tdisk分区
Probing devices to guess BIOS drives. This may take a long time.
Installation finished. No error reported.
This is the contents of the device map/tdisk/boot/ grub/device.map.
Check if this is correct or not. If any of the lines is incorrect,
fix it and re-rnn the script 'grub-install'.
(fd0) /dev/fd0
(hd0) /dev/sda
(hd1) /dev/sdb
#说明安装的设备文件名
查看一下:
[root@localhost ~]# ll /tdisk/boot/grub/
总用量272
-rw-r--r--. 1 root root 45 5 月 22 23:51 device.map
-rw-r--r--. 1 root root 13392 5 月 22 23:51 e2fs_stage1_5
-rw-r--r--. 1 root root 12632 5 月 22 23:51 fat_stage1_5
-rw-r--r--. 1 root root 11760 5 月 22 23:51 ffs_stage1_5
-rw-r--r--. 1 root root 11768 5 月 22 23:51 iso9660_stage1_5
-rw-r--r--. 1 root root 13280 5 月 22 23:51 jfs_stage1_5
-rw-r--r--. 1 root root 11968 5 月 22 23:51 minix_stage1_5
-rw-r--r--. 1 root root 14424 5 月 22 23:51 reiserfs_stage1_5
-rw-r--r--. 1 root root 512 5月 22 23:51 stage1
-rw-r--r--. 1 root root 125984 5月 22 23:51 stage2
-rw-r--r--. 1 root root 12036 5 月 22 23:51 ufs2_stage1_5
-rw-r--r--. 1 root root 11376 5 月 22 23:51 vstafs_stage1_5
-rw-r--r--. 1 root root 13976 5 月 22 23:51 xfs_stage1_5
GRUB 的相关文件已经安装到 /tdisk/boot/grub/ 目录中。当然,这些文件还是需要 GRUB 的配置文件来读取的。大家注意到了吗? /tdisk/boot/grub/ 目录中没有 grub.conf 或 menu.lst 配置文件,这些配置文件还是需要依赖 /boot/grub/ 目录的。
注意,如果系统中没有 grul-install 命令,则说明没有 GRUB 软件,这时可以源码包安装,也可以 RPM 包安装。RPM 包的安装命令如下:
[root@localhost ~]# rpm -ivh /mnt/cdrom/Packages/ grub-0.97-77.el6.i686.rpm
2) 修改GRUB的配置文件
在我们的实验中,GRUB 是已经安装好的,所以可以直接修改 /boot/grub/gmb.conf 配置文件。但如果是没有安装过 GRUB 的 Linux 系统手工安装 GURB,就需要自己建立 GRUB 配置文件了。那么我们修改 /boot/grub/grub.conf 配置文件如下:
[root@localhost ~]# vi /boot/gmb/grub.conf
default=0
timeout=5
splashimage=(hd0,0)/grub/splash.xpm.gz
hiddenmenu
title CentOS (2.6.32-279.el6.i686)
root(hd0,0)
kemel/vmlinuz-2.6.32-279.el6.i686 ro
root=UUID=b9a7a1 a8-767f-4a87-8a2ba535edb362c9 rd_NO_LUKS
KEYBOARDTYPE=pc KEYTABLE=us rd_NO_MD crashkemel=auto
LANG=zh_CN.UTF-8 rd_NO_LVM rd_NO_DM rhgb quiet
initrd/initramfs-2.6.32-279.el6.i686.img title CentOS tdisk #给自己这个启动分区起个名字吧
root(hd1,0)
#注意启动分区的位置是/dev/sdb1,也就是/tdisk目录
chainloader +1
#使用当前分区所在的启动扇区启动系统
在 title CentOS tdisk 段中不能指定内核镜像和 initramfs 虚拟文件系统,因为在 /tdisk/boot/ 目录中只有 grub 目录,而没有内核镜像文件和 initramfs 虚拟文件系统的镜像文件,所以需要通过 chainloader 来调用启动扇区。
3) 安装GRUB到/dev/sdb1分区的启动扇区中
刚刚通过 GRUB 配置文件中的 chainloader 来调用启动扇区,但是 /dev/sdb1 这个分区是新建立的,它的启动扇区中并没有 GRUB 程序。所以最后一步就是要在 /dev/sdb1 分区的启动扇区中安装 GRUB。这时就要利用 GRUB 交互模式了,如下:
[root@localhost boot]# grub
#启动进入GRUB交互模式
grub> root (hd0,0)
root (hd0,0)
Filesystem type is ext2fs, partition type 0x83
#设定GRUB的主目录,这里只能是(hd0,0),因为内核和虚拟文件系统安装在/dev/sdal中,也就是/boot分区中
grub> find /boot/gnab/stagel
find /boot/grub/stagel (hd1,0)
#查询一下Stage 1安装的分区
#好像有一点问题,我们在/boot和/tdisk分区中都安装了GRUB,只看到了/tdisk分区
grub> find /gcub/stagel
find /grub/stagel (hd0,0)
#只有这样才能看到/boot分区中的Stage 1。因为/boot分区是一个单独分区。上面能看到是因为/tdisk才是分区,而/boot/grub/只是/tdisk分区中的目录
grub> find /vmlinuz-2.6.32-279.el6.1686
find /vmlinuz-2.6.32-279.el6.i686 (hd0,0)
#能够查到内核位置。注意不能通过/boot/vmlinuz-2.6.32-279.el6.i686查询,还是因为/boot是单独分区。但是这次/tdisk分区中没有内核
grub> setup (hd1,0)
setup (hd1,0)
Checking if "/boot/grub/stagel" exists... no
Checking if "/grub/stagel" exists... yes
Checking if "/grub/stage2" exists... yes
Checking if "/grub/e2fs_stage1_5" exists... yes
Running "embed /grub/e2fs_stage1_5 (hd1,0)"... failed (this is not fatal)
Running "embed /grub/e2fs_stage1_5 (hd0,0)"... failed (this is not fatal)
Running "install /grub/stagel d (hd1,0) /grub/stage2 p /grub/grub.conf "...
succeeded
Done
#在/tdisk分区的启动扇区中安装GRUB吧。虽然有两个failed,但这只是两个文件系统的Stage 1.5文件没有安装,并不影响
grub> quit
#退出GRUB交互界面
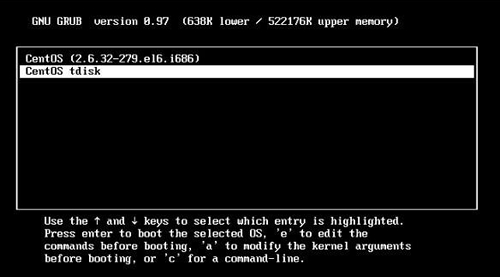
这时 GRUB 安装完成了,可以重新启动试验一下了。重启后可以看到图 1 所示的界面。


![汇编语言用Extern伪指令新建模块[附带实例] 汇编语言用Extern伪指令新建模块[附带实例]](https://www.hosteonscn.com/wp-content/cache/Beginning/thumbnail/8d38321cd5b4-175x80.jpg)
发表评论