OGNL表达式%、#和$用法详解(附带实例)
在实际开发过程中,OGNL 表达式要结合 struts2 的标签使用,主要就是%、#和$三个符号的使用。由于$被广泛应用于 EL 中,所以本小节将重点介绍%和#的用法。
1. # 符号
在 Struts2 框架中,#符号有三种用途,分别如下:
1)访问非根对象的属性。如访问 OGNL 上下文和 Action 上下文。由于 Struts2 中值栈被视为根对象,所以访问其他非根对象时,需要加#前缀。
#相当于 ActionContext.getContext()。例如‘#session.user’表达式相当于 ActionContext.getContext().getSession().getAttribute("user"),‘#request.userName’表达式相当于 request.getAttribute("userName")。
2)用于过滤和投影集合。如 books.{?#this.price>25}。
3)构造 Map。如 #{key1:value1,key2:value2},这种方式常用于给 radio 或 select、checkbox 等标签赋值。如果要在页面中取一个 Map 的值可以如下书写:<s:property value="#myMap['key']"/>。
2. % 符号
%是在标签的属性值被理解为字符串类型时,告诉执行环境‘%{}’中的是 OGNL 表达式,并计算 OGNL 表达式的值。
3. $ 符号
$符号主要用于在 Struts2 配置文件中引入 OGNL 表达式。例如下面的配置所示:
<action name="userAction_*" class="userAction" method="{1}">
    <result name="add" type="redirect">
        userAction_findById?userId=${User.userId}
    </result>
</action>
为了让读者更好地理解和掌握 OGNL,下面通过一个案例演示 OGNL 的使用。
1. 创建项目
在 MyEclipse 中创建一个名称为 struts2Demo05 的 Web 项目,并引入 Struts2 所需 JAR 包,然后添加上过滤器信息。
2. 创建实体类
在项目的 src 目录下创建一个名称为 com.mengma.ognl 的包,在包中新建一个名称为 Person 的类,该类中包含 name、age 和 birthday 三个属性以及其 getter 和 setter 方法,如下所示。
package com.mengma.ognl;

import java.util.Date;

public class Person {
    private String name;
    private int age;
    private Date birthday;

    public String getName() {
        return name;
    }

    public void setName(String name) {
        this.name = name;
    }

    public int getAge() {
        return age;
    }

    public void setAge(int age) {
        this.age = age;
    }

    public Date getBirthday() {
        return birthday;
    }

    public void setBirthday(Date birthday) {
        this.birthday = birthday;
    }
}
3. 创建 Action
在 com.mengma.ognl 包中创建一个名称为 OgnlAction 的 Action 类,编辑后如下所示。
package com.mengma.ognl;

import java.util.Date;
import java.util.LinkedList;
import java.util.List;

import javax.servlet.http.HttpServletRequest;

import org.apache.struts2.ServletActionContext;

import com.opensymphony.xwork2.ActionContext;
import com.opensymphony.xwork2.ActionSupport;

public class OgnlAction extends ActionSupport {
    private List<Person> persons; // 声明Person对象

    public List<Person> getPersons() {
        return persons;
    }

    public void setPersons(List<Person> persons) {
        this.persons = persons;
    }

    // 测试方法
    public String ognlTest() throws Exception {
        // 获得ActionContext实例
        ActionContext ctx = ActionContext.getContext();
        ctx.getApplication().put("msg", "application信息"); // 存入application中

        ctx.getSession().put("msg", "session信息"); // 保存session
        HttpServletRequest request = ServletActionContext.getRequest();
        // 保存到request
        request.setAttribute("msg", "request信息");
        persons = new LinkedList<Person>();
        Person person1 = new Person();
        person1.setName("AAA");
        person1.setAge(26);
        person1.setBirthday(new Date());
        persons.add(person1);

        Person person2 = new Person();
        person2.setName("BBB");
        person2.setAge(36);
        person2.setBirthday(new Date());
        persons.add(person2);

        Person person3 = new Person();
        person3.setName("CCC");
        person3.setAge(16);
        person3.setBirthday(new Date());
        persons.add(person3);

        return SUCCESS;
    }
}
上述代码中,首先声明了 Person 对象,并实现了它的 getter 和 setter 方法。然后在测试方法 ognlTest() 中,首先获得了 ActionContext 实例,然后通过 ActionContext 的实例分别向 Application、Session 和 Request 中存入相应信息,最后创建了 Person 对象,并向 Person 对象中添加了三个人员信息。
4. 创建配置文件
在项目的 src 目录下创建配置文件 struts.xml,并配置 Action 的信息。编辑后如下所示。
<?xml version="1.0" encoding="UTF-8"?>
<!DOCTYPE struts PUBLIC
    "-//Apache Software Foundation//DTD Struts Configuration 2.3//EN"
    "http://struts.apache.org/dtds/struts-2.3.dtd">
<struts>
<package name="struts2" namespace="/" extends="struts-default">
  <action name="ognl" class="com.mengma.ognl.OgnlAction" method="ognlTest">
   <result>/ognl.jsp</result>
  </action>
</package>
</struts>
5. 创建显示页面文件
在项目的 WebContent 目录下创建一个名称为 ognl.jsp 的文件,编辑代码后如下所示。
<%@ page language="java" contentType="text/html; charset=UTF-8"
    pageEncoding="UTF-8"%>
<%@taglib prefix="s" uri="/struts-tags"%>
<!DOCTYPE html PUBLIC "-//W3C//DTD HTML 4.01 Transitional//EN" "http://www.w3.org/TR/html4/loose.dtd">
<html>
<head>
<meta http-equiv="Content-Type" content="text/html; charset=UTF-8">
<title>OGNL的使用</title>
</head>
<body>
    <h3>访问OGNL上下文和Action上下文</h3>
    <!-- 使用OGNL访问属性值 -->
    <p>
        request.msg:
        <s:property value="#request.msg" />
    </p>
    <p>
        session.msg:
        <s:property value="#session.msg" />
    </p>
    <p>
        application.msg:
        <s:property value="#application.msg" />
    </p>
    <p>
        attr.msg:
        <s:property value="#attr.msg" />
    </p>
    <hr />
    <h3>用于过滤和投影集合</h3>
    <p>年龄大于20</p>
    <ul>
        <!-- 判断年龄 -->
        <s:iterator value="persons.{?#this.age>20}">
            <li><s:property value="name" />-年龄:<s:property value="age" />
            </li>
        </s:iterator>
    </ul>
    <p>
        姓名为AAA的年龄:
        <s:property value="persons.{?#this.name=='AAA'}.{age}{0}" />
    </p>
    <hr />
    <h3>构造Map</h3>
    <s:set name="foobar" value="#{'foo1':'bar1','foo2':'bar2'}" />
    <p>
        The value of key "foo1" is
        <s:property value="#foobar[foo1]" />
    </p>
    <hr />
    <h3>%符号的用法</h3>
    <s:set name="key" value="#{'key1':'value1','key2':'value2'}" />
    <p>
        key1的值是
        <s:property value="#key['key1']" />
    </p>
    <p>
        不使用%:
        <s:url value="#key['key1']" />
    </p>
    <p>
        使用%:
        <s:url value="%{#key['key1']}" />
    </p>
    <hr />
    <%
        request.setAttribute("req", "request scope");
        request.getSession().setAttribute("sess", "session scope");
        request.getSession().getServletContext()
                .setAttribute("app", "application scope");
    %>
    <h3>通过OGNL表达式获取属性范围中的值</h3>
    <br />
    <s:property value="#request.req" />
    <br />
    <s:property value="#session.sess" />
    <br />
    <s:property value="#application.app" />
    <br />
</body>
</html>
6. 运行项目并查看结果
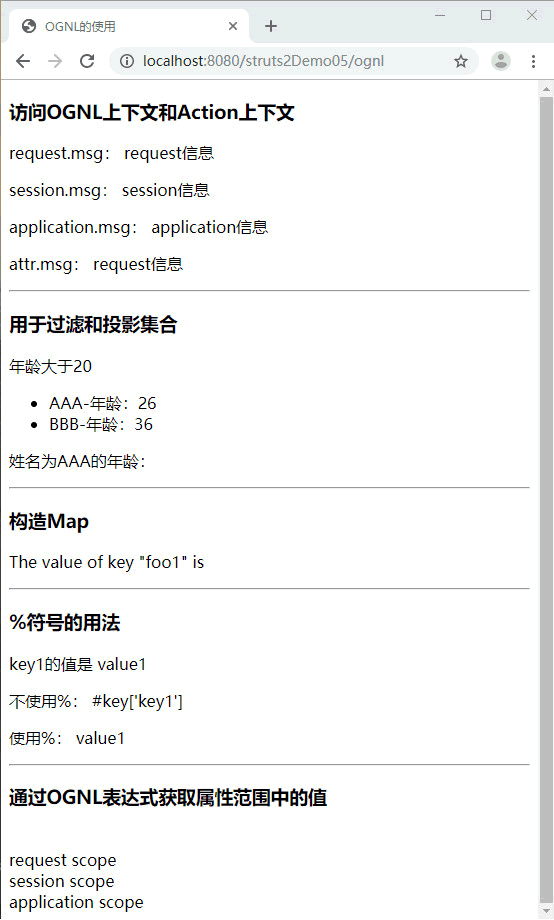
启动服务器后,在浏览器的地址栏中输入地址 http://localhost:8080/struts2Demo05/ognl,浏览器的显示结果如图 1 所示。


发表评论