SSH框架(Struts2+Spring+Hibernate)搭建整合详细步骤
在实际项目的开发中,为了充分利用各个框架的优点,我们通常都会把 Spring 与其他框架整合在一起使用。本节将针对 SSH(Struts2、Hibernate 和 Spring)框架的整合内容进行详细讲解。
准备整合环境
整合就是将不同的框架放在一个项目中,共同使用它们的技术,发挥它们的优点,并形成互补。一般而言,在进行整合之前都要准备整合环境。下面对 SSH 框架的整合环境配置进行详细讲解。
1. 数据库环境
由于整合 SSH 框架时,需要连接数据库进行测试,因此需要准备数据库环境。在 MySQL 数据库中创建一个名称为 ssh 的数据库,并在数据库中创建一个名称为 person 的表,该表中包含 2 个字段,分别是 id 和 name,其中 id 是表的主键,name 表示名称。创建数据库和表的 SQL 语句如下所示:
CREATE DATABASE ssh;
USE ssh;
CREATE TABLE person(
    id VARCHAR(32) NOT NULL,
    NAME VARCHAR(50) NOT NULL,
    PRIMARY KEY(id)
);
2. 配置 Struts2 环境
1)创建项目并导入 Struts2 框架所需的 JAR 包
在 MyEclipse 中创建一个名称为 ssh 的 Web 项目,在项目的 lib 目录中添加 Struts2 框架所需的 JAR 包,并发布到类路径下。本教程中使用的 struts-2.3.37 版本需要导入 13 个 JAR 包,具体如下。
- asm-3.3.jar
- asm-commons-3.3.jar
- asm-tree-3.3.jar
- commons-fileupload-1.4.jar
- commons-io-2.2.jar
- commons-lang3-3.2.jar
- freemarker-2.3.28.jar
- javassist-3.11.0.GA.jar
- log4j-api-2.3.jar
- log4j-core-2.3.jar
- ognl-3.0.21.jar
- struts2-core-2.3.37.jar
- xwork-core-2.3.37.jar
2)添加 log4j.properties 文件
在实际项目开发时,通常需要记录项目日志信息。这时可以在项目中添加一个名称为 log4j.properties 的文件,用于打印日志信息。
在添加 log4j.properties 文件之前,首先在项目中创建一个名为 config 的源文件夹(Source Folder),该文件夹专门用于存放各种配置文件。然后在 Hibernate 解压包中的 project\etc 路径下找到 log4j.properties 的文件,并复制到 config 源文件夹中。打开并编辑后,如下所示。
### direct log messages to stdout ###
log4j.appender.stdout=org.apache.log4j.ConsoleAppender
log4j.appender.stdout.Target=System.out
log4j.appender.stdout.layout=org.apache.log4j.PatternLayout
log4j.appender.stdout.layout.ConversionPattern=%d{ABSOLUTE} %5p %c{1}:%L - %m%n
### direct messages to file mylog.log ###
log4j.appender.file=org.apache.log4j.FileAppender
log4j.appender.file.File=c:/mylog.log
log4j.appender.file.layout=org.apache.log4j.PatternLayout
log4j.appender.file.layout.ConversionPattern=%d{ABSOLUTE} %5p %c{1}:%L - %m%n
### set log levels - for more verbose logging change 'info' to 'debug' ###
log4j.rootLogger=info, stdout
在上述配置代码中,两个 ### 之间的内容是文件的注释信息,第 2~5 行内容表示输出信息到控制台,第 7~10 行内容表示输出日志文件 mylog.log 到 D 盘,第 12 行内容表示设置日志级别为 info,并输出到控制台显示。
关于 log4j 配置文件更详细的讲解,读者可查找相应的资料进行学习,由于本教程篇幅有限,此处就不再赘述,望读者见谅。
3)配置 Struts2 的核心过滤器
在项目的 web.xml 文件中配置 Struts2 的核心过滤器,如下所示。
<?xml version="1.0" encoding="UTF-8"?>
<web-app xmlns:xsi="http://www.w3.org/2001/XMLSchema-instance" xmlns="http://java.sun.com/xml/ns/javaee" xmlns:web="http://java.sun.com/xml/ns/javaee/web-app_2_5.xsd" xsi:schemaLocation="http://java.sun.com/xml/ns/javaee http://java.sun.com/xml/ns/javaee/web-app_2_5.xsd" version="2.5">
    <!-- 配置Struts2核心过滤器 -->
    <filter>
        <filter-name>struts2</filter-name>
        <filter-class>
            org.apache.struts2.dispatcher.ng.filter.StrutsPrepareAndExecuteFilter
        </filter-class>
    </filter>
    <filter-mapping>
        <filter-name>struts2</filter-name>
        <url-pattern>/*</url-pattern>
    </filter-mapping>
</web-app>
4)添加 struts.xml 配置文件
在 config 文件夹下添加 Struts2 的配置文件 struts.xml,并在文件中将 Struts2 框架配置为开发模式和 simple 主题,如下所示。
<?xml version="1.0" encoding="UTF-8"?>
<!DOCTYPE struts PUBLIC
    "-//Apache Software Foundation//DTD Struts Configuration 2.3//EN"
    "http://struts.apache.org/dtds/struts-2.3.dtd">
<struts>
    <!-- 开发模式 -->
    <constant name="struts.decMode" value="true" />
    <!-- 把主题配置成simple -->
    <constant name="struts.ui.theme" value="simple" />
    <package name="common" namespace="/" extends="struts-default">
    </package>
</struts>
3. 配置 Spring 环境
1)导入 Spring 依赖的 JAR 包
从 Spring 文件的 libs 目录和第三方依赖包中选取所需的 JAR 包,添加到项目的 lib 目录中,并发布到类路径下。本教程中使用的 Spring 3.2.13 版本依赖的基础 JAR 包共有 15 个,具体如下。
- spring-aop-3.2.13.RELEASE.jar
- spring-aspects-3.2.13.RELEASE.jar
- spring-beans-3.2.13.RELEASE.jar
- spring-context-3.2.13.RELEASE.jar
- spring-core-3.2.13.RELEASE.jar
- spring-expression-3.2.13.RELEASE.jar
- spring-jdbc-3.2.13.RELEASE.jar
- spring-test-3.2.13.RELEASE.jar
- spring-tx-3.2.13.RELEASE.jar
- spring-web-3.2.13.RELEASE.jar
- spring-orm-3.2.13.RELEASE.jar
第三方依赖包:
- com.springsource.org.aopalliance-1.0.0.jar
- com.springsource.org.apache.commons.logging-1.1.1.jar
- com.springsource.org.aspectj.weaver-1.6.8.RELEASE.jar
- commons-logging-1.2.jar
在上述 15 个 JAR 包中,Spring 自带的 JAR 包可以在下载的 Spring 文件的 libs 目录中查找到,而 4 个第三方依赖包可以在网址 https://repo.spring.io/webapp/#/search/quick/ 中搜索并下载。
2)添加 Spring 的核心配置文件
在项目的 config 文件夹中创建一个名称为 spring 的包,并在包中创建 Spring 的核心配置文件 applicationContext.xml,如下所示。
<?xml version="1.0" encoding="UTF-8"?>
<beans xmlns="http://www.springframework.org/schema/beans"
    xmlns:xsi="http://www.w3.org/2001/XMLSchema-instance"
    xmlns:context="http://www.springframework.org/schema/context"
    xmlns:tx="http://www.springframework.org/schema/tx"
    xmlns:aop="http://www.springframework.org/schema/aop"
    xsi:schemaLocation="http://www.springframework.org/schema/beans
            http://www.springframework.org/schema/beans/spring-beans-2.5.xsd
            http://www.springframework.org/schema/context
            http://www.springframework.org/schema/context/spring-context.xsd
            http://www.springframework.org/schema/tx
            http://www.springframework.org/schema/tx/spring-tx-2.5.xsd
            http://www.springframework.org/schema/aop
            http://www.springframework.org/schema/aop/spring-aop-2.5.xsd">
</beans>
3)配置 Spring 的监听器和过滤器
在 web.xml 文件中配置 Spring 的监听器信息,其代码如下所示:
<!-- 监听器 -->
<context-param>
    <param-name>contextConfigLocation</param-name>
    <param-value>classpath:spring/applicationContext.xml</param-value>
</context-param>
<listener>
    <listener-class>
        org.springframework.web.context.ContextLoaderListener
    </listener-class>
</listener>
<!-- 添加过滤器,延迟session关闭 -->
<filter>
    <filter-name>OpenSessionInViewFilter</filter-name>
    <filter-class>
        org.springframework.orm.hibernate3.support.OpenSessionInViewFilter
    </filter-class>
</filter>
<filter-mapping>
    <filter-name>OpenSessionInViewFilter</filter-name>
    <url-pattern>/*</url-pattern>
</filter-mapping>
在上述配置信息代码中,ContextLoaderListener 是由 Spring 提供的一个监听器类,它在创建时会自动查找名为 contextConfigLocation 的初始化参数,并使用该参数所指定的配置文件,此处表示类路径下 spring 目录中的 applicationContext.xml 文件。
OpenSessionInViewFilter 过滤器的主要功能是延迟 Session 的关闭时间,从而保证延迟加载操作的顺利进行。
4. 配置 Hibernate 环境
1)导入 Hibernate 所需的 JAR 包
本教程所使用的是 Hibernate 3.6.10 版本,此版本的 Hibernate 所依赖的 JAR 包共 12 个,具体如下。
- antlr-2.7.6.jar
- c3p0-0.9.1.jar
- commons-collections-3.1.jar
- dom4j-1.6.1.jar
- hibernate-jpa-2.0-api-1.0.1.Final.jar
- hibernate3.jar
- javassist-3.12.0.GA.jar(不需要添加)
- jta-1.1.jar
- log4j-1.2.17.jar
- mysql-connector-java-5.1.0-bin.jar
- slf4j-api-1.6.1.jar
- slf4j-log4j12-1.6.1.jar
选取上述 JAR 包,添加到 ssh 项目的 WEB-INF/lib 目录中,并发布到类路径下。需要注意的是,在上述 JAR 包中,javassist-3.12.0.GA.jar 在配置 Struts 2 环境时已经添加过,所以这里不需要重复添加。
2)添加核心配置文件 hibernate.cfg.xml
在项目的 config 文件夹中创建一个名称为 hibernate 的包,并在该包中添加配置文件 hibernate.cfg.xml,如下所示。
<?xml version="1.0" encoding="UTF-8"?>
<!DOCTYPE hibernate-configuration PUBLIC
          "-//Hibernate/Hibernate Configuration DTD 3.0//EN"
          "http://hibernate.sourceforge.net/hibernate-configuration-3.0.dtd">
<hibernate-configuration>
    <session-factory>
        <!-- 1. 基本4项 -->
        <property name="hibernate.connection.driver_class">
            com.mysql.jdbc.Driver
        </property>
        <property name="hibernate.connection.url">
              <![CDATA[jdbc:mysql://localhost:3306/ssh?useUnicode=true&characterEncoding=utf-8]]>
        </property>
        <property name="hibernate.connection.username">root</property>
        <property name="hibernate.connection.password">1128</property>
        <!-- 2.指定方言 -->
        <property name="hibernate.dialect">
            org.hibernate.dialect.MySQL5Dialect
        </property>
        <!-- 3.sql语句 -->
        <property name="hibernate.show_sql">true</property>
        <property name="hibernate.format_sql">true</property>
        <property name="hibernate.hbm2ddl.auto">update</property>
        <!-- 4.取消验证 -->
        <property name="javax.persistence.validation.mode">none</property>
        <!-- 5.本地线程绑定 -->
        <property name="hibernate.current_session_context_class">thread</property>
        <!-- 6.整合C3P0 -->
        <property name="hibernate.connection.provider_class">
            org.hibernate.connection.C3P0ConnectionProvider
        </property>
        <!--在连接池中可用的数据库连接的最少数目 -->
        <property name="c3p0.min_size">5 </property>
        <!--在连接池中所有数据库连接的最大数目 -->
        <property name="c3p0.max_sizen">20 </property>
        <!--设定数据库连接的过期时间,以ms为单位,如果连接池中的某个数据库连接空闲状态的时间 超过timeout时间,则会从连接池中清除 -->
        <property name="c3p0.timeout">120 </property>
        <!--每3000s检查所有连接池中的空闲连接以s为单位 -->
        <property name="c3p0.idle_test_period">3000 </property>
        <!-- 配置所有的hbm.xml,交予Spring管理映射文件 -->
    </session-factory>
</hibernate-configuration>
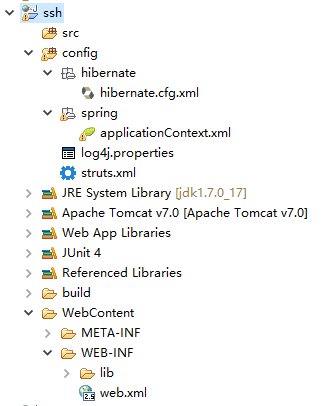
在上述配置中,分别配置了连接数据库的四项基本信息、方言等内容。至此,Strut2、Spring 和 Hibernate 的环境均准备完成,完成后的项目环境结构如图 1 所示。


发表评论