AJAX下载和显示远程图片(案例实战)
在 JavaScript 中,当 XMLHttpRequest 对象的 responseType 属性设置为 arraybuffer 时,服务器端响应数据将是一个 ArrayBuffer 对象。
目前,Firefox 8+、Opera 11.64+、Chrome 10+、Safari 5+ 和 IE 10+ 版本浏览器支持将 XMLHttpRequest 对象的 responseType 属性值指定为 arraybuffer。
示例
下面示例设计在页面中显示一个“下载图片”按钮和一个“显示图片”按钮,单击“下载图片”按钮时,从服务器端下载一幅图片的二进制数据,在得到服务器端响应后创建一个 Blob 对象,并将该图片的二进制数据追加到 Blob 对象中,使用 FileReader 对象的 readAsDataURL() 方法将 Blob 对象中保存的原始二进制数据读取为 DataURL 格式的 URL 字符串,然后将其保存在 IndexDB 数据库中。
单击“显示图片”按钮时,从 IndexDB 数据库中读取该图片的 DataURL 字符串,创建一个 img 元素,然后将该 URL 字符串设置为 img 元素的 src 属性值,在页面上显示该图片。
<script>
    window.indexedDB = window.indexedDB || window.webkitIndexedDB || window.mozIndexedDB || window.msIndexedDB;
    window.IDBTransaction = window.IDBTransaction || window.webkitIDBTransaction || window.msIDBTransaction;
    window.IDBKeyRange = window.IDBKeyRange || window.webkitIDBKeyRange || window.msIDBKeyRange;
    window.IDBCursor = window.IDBCursor || window.webkitIDBCursor || window.msIDBCursor;
    window.URL = window.URL || window.webkitURL;
    var dbName = 'imgDB';
    var dbVersion = 20191017;
    var idb;
    function init () {
        var dbConnect = indexedDB.open (dbName, dbVersion);
        dbConnect.onsuccess = function (e) {
            idb = e.target.result;
        };
        dbConnect.onerror = function () { console.log('数据库连接失败'); };
        dbConnect.onupgradeneeded = function (e) {
            idb = e.target.result;
            var tx = e.target.transaction;
            tx.onabort = function (e) {
                console.log('对象仓库创建失败');
            };
            var name = 'img';
            var optionalParameters = {
                keyPath : 'id',
                autoIncrement : true
            };
            var store = idb.createObjectStore (name, optionalParameters);
            console.log('对象仓库创建成功');
        };
    }
    function downloadPic () {
        var xhr = new XMLHttpRequest();
        xhr.open('GET', 'image/1.png', true);
        xhr.responseType = 'arraybuffer';
        xhr.onload = function (e) {
            if (this.status == 200) {
                var bb = new Blob([this.response]);
                var reader = new FileReader();
                reader.readAsDataURL (bb);
                reader.onload = function (f) {
                    var result = document.getElementById("result");
                    //在indexDB数据库中保存二进制数据
                    var tx = idb.transaction(['img'], "readwrite");
                    tx.oncomplete = function () { console.log('保存数据成功'); }
                    tx.onabort = function () { console.log('保存数据失败'); }
                    var store = tx.objectStore ('img');
                    var value = { img : this.result };
                    store.put (value);
                }
            }
        };
        xhr.send();
    }
    function showPic () {
        var tx = idb.transaction (['img'], "readonly");
        var store = tx.objectStore ('img');
        var req = store.get(1);
        req.onsuccess = function () {
            if (this.result == undefined) {
                console.log("没有符合条件的数据");
            } else {
                var img = document.createElement ('img');
                img.src = this.result.img;
                document.body.appendChild (img);
            }
        }
        req.onerror = function () {
            console.log("获取数据失败");
        }
    }
</script>
<body onload="init()">
    <input type="button" value="下载图片" onclick="downloadPic()"><br />
    <input type="button" value="显示图片" onclick="showPic()"><br />
    <output id="result"></output>
</body>
操作步骤
1) 当用户单击“下载图片”按钮时,调用 downloadPic() 函数,在该函数中,XMLHttpRequest 对象从服务器端下载一幅图片的二进制数据,在下载时将该对象的 responseType 属性值指定为 arraybuffer 对象。
var xhr = new XMLHttpRequest();
xhr.open('GET', 'image/1.png', true);
xhr.responseType = 'arraybuffer';
2) 在得到服务器端响应后,使用该图片的二进制数据创建一个 Blob 对象。然后创建一个 FileReader 对象,并且使用 FilReader 对象的 readAsDataURL() 方法将 Blob 对象中保存的原始二进制数据读取为 DataURL 字符串,然后将其保存在 IndexDB 数据库中。
3) 单击“显示图片”按钮时,从 IndexDB 数据库中读取该图片的 DataURL 格式的 URL 字符串,然后创建一个用于显示图片的 img 元素,然后将该 URL 字符串设置为 img 元素的 src 属性值,在该页面上显示下载的图片。
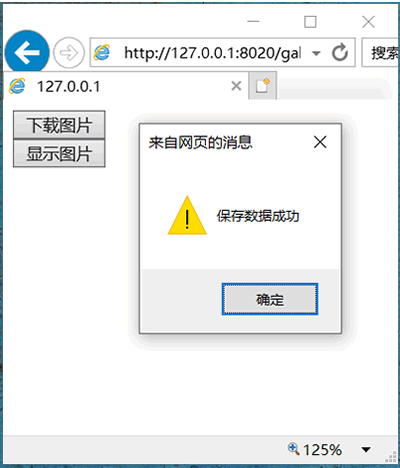
在浏览器中预览,单击页面中“下载图片”按钮,脚本从服务器端下载图片并将该图片二进制数据的 DataURL 格式的 URL 字符串保存在 indexDB 数据库中,保存成功后在弹出的提示信息框中显示“保存数据成功”,效果如下图所示。


发表评论